Pages

Saturday, November 23, 2013

Speedy Rosemary Sugar Cookies

I read this recipe by Sally's Baking Addiction for sugar cookies, and decided to make something very similar for my mother, who is a rosemary aficionado.  The cookies are super soft, smell strongly of rosemary, and are just fine without any topping-- though I think they're much prettier with the icing.
My take on the recipe takes less time than Sally's, because I skip the long chilling of the dough.  But do bear in mind that my kitchen is freezing-- if you are in a warmer house, you may want to chill the dough for an hour or so before baking the cookies, to avoid excessive spreading.


Ingredients:

For cookies:

1 stick / 115g unsalted butter at room temperature
3/4 cup / 220g white sugar
1 egg
1 tsp / 5mL vanilla extract
1 Tbsp / 3g rosemary leaves
2 tsp / 3g baking powder
1 1/2 cups / 190g white flour

For frosting:

3/4 cup / 100g powdered sugar
2-5 tsp / 5-20mL milk
1 tsp / 5mL vanilla
2 tsp / 2g rosemary leaves
1/4 tsp / .5g dried lemon zest

Procedure:

Line 3 baking sheets with parchment paper.
Beat butter until it is light and fluffy.
Cream sugar and butter, then stir in vanilla extract and egg.
Add rosemary leaves and stir until smooth.
In a separate bowl, combine baking powder, salt, and flour.
Mix dry and wet ingredients.
Roll dough into little columns, about half the size of your index finger, and about 1 inch/2cm diameter.
Place these dough columns far, far apart on the cookie sheets-- you'll end up with about 10 cookies per sheet.  The column shape makes the cookies tall and fluffy, not flat, as they spread out.
After rolling all of the dough, place the baking sheets in a cold place.  Fridge, freezer, or cold outdoors (covered, of course!)
Set oven to 350˚F / 180˚C.
Bake cookies for eight minutes.  They will be white when you take them out.
Let cool on sheets for about five minutes, then transfer to cooling rack.


Make the icing:
Combine powdered sugar, lemon zest, and rosemary.
Stir in vanilla extract, then add milk until everything is just smooth.
Immediately drizzle over cooled cookies and let harden for seven minutes.
Serve!

Tuesday, September 3, 2013

Russian-style Pancakes with Banana and Rye

Unfortunately, in the cooking process, I used the last
of the sour cream.  These are nice alongside powdered
sugar in a pinch.
Russians have a wide variety of pancake-like breakfasts: syrniki, which are dense and made of farmer's cheese, blini, which are very thin, and alladushki, which are like American pancakes, but denser.
This is a recipe for alladishki.  The alladushki are rather sweet on their own, and are best when served with sour cream, orange marmalade, or anything else with a sour note present.

While cooking, I used sour cream, although you can easily substitute strained yoghurt for it.


Ingredients:

210g / 1.5 cup white flour
60g / 0.3 cup rye flour
50g / 0.25 cup sugar
8g / 2 tsp baking soda
dash salt
1g / 0.5 tsp cinnamon
2g / 1 tsp orange zest (dry)
130g / 0.5 cup sour cream
1 egg
45g / 2 Tbsp honey
200g / 1 cup milk
Oil or butter, for cooking
2 or 4 bananas
note: if you want the bananas to be on both sides of the alladushki, use 4.

Procedure:

Slice bananas into 1cm / 0.5 inch rounds.
Combine dry ingredients, mix well.
In a separate bowl, combine wet ingredients, except for the banana and mix well.
Heat a pan to medium-low temperature, and warm up oil.
Once the pan is hot, mix all of your wet and dry ingredients together.
Pour a large spoonful of batter onto the pan.
note: if you used 4 bananas, before pouring the batter, place 3-4 rounds onto the pan and put the batter on top of those.
Place 3-4 rounds of banana on the wet batter facing towards you.
Let sit until edges are just slightly browned, around three minutes, making sure not to burn the alladushki.
Flip alladushki over with a spatula and cook their other side for a bit shorter time, a little less than two minutes.
Cook all of the batter as such.
Serve hot or cold-- these keep well in the fridge,
 in an airtight container.


Sunday, June 30, 2013

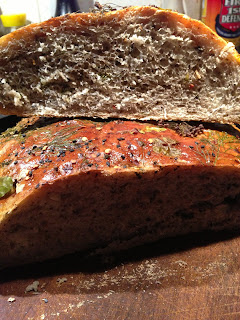
Sesame Garlic Bread

After reading Andew Whitley's book, Bread Matters, I decided to try out making yeast-leavaned bread for once in my life.  I recommend his book to those interested in bread-making, as it covers a wide scope of bready topics and explains rather well dough-related jargon and practices.
Here, I'm posting his recipe for a simple white bread, with my modifications.

As an aside, throughout the book, Whitley reminds the readers that a wet, difficult to work with dough is not terrible.  This dough will stick to your hands quite a bit, but Whitley is correct that adding extra flour really does do unsavory things to the texture.  For this reason, I kneaded the dough in the air, and as it could not stick to a table, the temptation to add excess flour was minimal.

Ingredients

600g / 4.75 cups strong bread flour
(200g + 200g) / (1 cup+ 0.6 cup) warm (~35˚C / 95˚F) water
8g / 0.25 oz fresh yeast
3g / 2T dried black tea leaves, powdered
5g / 1t salt
3g / 1T chili pepper flakes
30mL / 2T sesame seed oil
5g / 3T fresh chives, chopped finely
2g / 1.5t fresh ginger, grated
Handful arugula leaves, torn into shreds
5-10 basil leaves, torn into shreds
3 cloves garlic, diced
3g / 1T black sesame seeds

Butter or coconut oil, for oiling

1 egg yolk
Well-preserved herb leaves, herby flowers, sesame seeds, and chili pepper flakes to decorate

Procedure

In a bowl, mix bread flour, tea leaves, chili pepper flakes, and salt
Dissolve 8g yeast in 200g warm water, and pour water into flour mixture.
Wash out bowl with remaining 200g water, and pour into flour mixture.
Using your hands, mix the dough until it comes together.
Lift dough out of the bowl and knead in the air, as though you were clapping, for 10-15 minutes.  The dough should be relatively smooth at the surface, springy, and supple.
Return dough to its bowl and cover with a plastic bag.
Let rest in a warm place for 2 hours, or until dough has doubled in volume.
After 2 hours, oil a large cooking vessel.
note: cast iron cookware gives a great-looking crust to the bread.
Assemble ginger, sesame seeds, arugula, basil, garlic, and sesame oil.  Place on top of dough.
Take dough out of bowl and incorporate additions into dough using kneading motions.
On a flat, lightly floured surface, plop down dough and flatten into a square.
Fold in half, and flatten.
Roll into thirds, and flatten again.
Roll into a cylinder and transport into cooking vessel
note: these steps are done to arrange the dough's gluten proteins in such a way that the dough doesn't try to explode from the bread as it bakes.  They are much easier said than done, and I did these steps very loosely.
Let rise in cooking vessel for 30 or so minutes.
Preheat oven to 230˚C/450˚F
Break an egg yolk in a small bowl, and brush onto risen dough, gently, so as to not deflate it.
Decorate dough as you wish with flowers, leaves, herbs, and seeds.
note: I used dill, onion flowers, arugula flowers, wood sorrel, basil, and arugula leaves.  These additions do not affect the flavor of the bread's dough.
Bake for 10 minutes, rotating halfway if you have poor convection.
Turn oven down to 205˚C/400˚F.
Bake for another 30 minutes, again turning halfway if you have poor convection.
If dough sounds dense after baking time has passed, let sit in hot oven for 5 or so minutes.
Remove from oven, cover in a cotton cloth, and let cool on a wire rack to prevent soggy bread bottoms.

Monday, June 10, 2013

Apple Cornbread

After reading this cornbread recipe, I very much wanted to make something similar.  I modified the ingredients slightly to fit what I had in my kitchen.
This cornbread has a pleasant smell and is just sweet enough to be a dessert.  I am very satisfied with the texture, which is crumbly without being mealy.

Ingredients:

125 g / 1 cup white flour
115 g / 1 cup corn meal
13 g / 3.5 t baking powder
6 g / 1 t salt
1 1/2 large apples, or 3 small ones
note: select apples that are good for baking.  Very crunchy as well as mealy apples tend to bake poorly, so if possible, select more sturdy types, such as Gala, Fuji, or Granny Smith.
85 g / 6 T unsalted butter
2 eggs
30g / 1.5 T wildflower honey
75 g / 0.3 cups + 1 T brown sugar
note: Turbinado or molasses-darkened sugar both work here
240 mL / 1 cup milk
Optional: generous handful mixed berries and/or raisins


Procedure:

Preheat oven to 205˚C / 400˚F
Chop apples into slices or rounds no thicker than 0.75cm / 0.3 inch.  Remove peels if they are rough.
In a bowl, stir together flour, corn meal, baking powder and salt.
Heat butter until it is still solid, but very soft.
Add in butter, honey, sugar, eggs, and milk to the bowl.
Mix until no clumps are present.
If using, stir in berries and raisins.
Oil a 30cm / 12 inch diameter round baking dish, such as a cake pan or cast iron skillet.
Place one third of the chopped apple slices on the bottom of the dish, and cover with one half of the batter.
Place another third of the apple slices atop of the batter, and then cover with the remaining mixture.
Place final third of apple slices on top of the batter.
Bake for 25-30 minutes, until a brown crust is present and the center does not jiggle.
Serve warm.


Sunday, June 2, 2013

Walnut Scones


This is a recipe for simple walnut scones.  The dough can be very quickly assembled, and is not too sweet, but rather rich.  The scones kind of look like biscuits, but I'd like to think that their taste and smell make up for that discrepancy.  If you wish to make them look more dessert-like, you could sprinkle the dough with large-grain sugar, like turbinado, or cover in an icing (such as a glaze made from a few spoons of milk and half a cup of confectioner's sugar, with some lemon zest).
These can be served warm or cold, and the given proportions yield about 16 medium sized pieces.

Ingredients:
2 cups / 290g white flour
4T / 50g white sugar
0.5 t / 3g baking soda
0.5T / 5g baking powder
Dash salt
6T / 85g cold butter, cubed
1.25 cups + 1T / 250mL cream
0.5T / 5mL vanilla extract
0.5 cup / 60g walnuts, crushed into pieces 1cm or smaller

Procedure
Preheat oven to 425˚F / 220˚C.
In a large bowl, combine all dry ingredients and combine well.
Add in butter cubes, and mix well either with a large wooden spoon or with very clean hands.
Gradually stir in cream and vanilla extract.  Stop mixing once dough becomes evenly moist.
Stir in walnut pieces.
Drop scones in circles on a parchment-covered baking sheet, or cut into triangle shapes.  Make scones approximately the size of a deck of cards.
Bake for 15 minutes, rotating the sheet halfway through the process if you have poor convection.
note: you will probably have two batches of scones.


Sunday, May 19, 2013

Curry-Fried Plantains

Plantains are the starchier, less sweet brothers of bananas.  They remind me of potatoes when I cook them, but more delicate.  This is a recipe for very spicy plantains-- if you find it to be too hot to eat as is, you can stir in a few spoonfuls of canned coconut milk upon taking off of the pan.  The addition of coconut milk will make the plantains more soft, less like a finger food.
Be careful!  You must be sure to add just enough coconut milk to coat the plantains, to avoid making a very unsavory soup

Ingredients:

15mL / 1 T coconut oil
Dash asafoetida/hing powder
5g / 2 t tumeric powder
5g / 2 t coriander powder
2g / 1 t cayenne pepper
5g / 2 t  cumin powder
2 plantains
12g / 1 T dark brown sugar
note: I refer here to the American brown sugar, which is white sugar mixed with molasses.  If you have none, you could either mix equal amounts of sugar and molasses together and add that, or simply use all white sugar.
Pinch salt

Procedure:

Melt oil in pan on medium-low heat.
Add all of the spices and stir until aromatic and a shade darker, from three to five minutes.
As the spices heat, peel and chop the plantain into circles 1cm / 0.5 inch thick.
Add the plantain to the oil in one layer, trying to avoid having the pieces touch.
Raise heat to medium-high.
Let sit uncovered for five minutes, until the bottoms have a crust.
Turn over the plantains and cook the other side for another three minutes.
Continue cooking and flipping until both sides of the plantain are nicely browned, and the plantain feels like an almost-ripe avocado to your spatula.
Sprinkle sugar and salt atop of the plantains and flip once more, turning off the heat.
Serve!

Wednesday, April 17, 2013

Tahini Eggplant

This is not a very sweet recipe, but I enjoy it very much for how satiating it is, and its ability to be eaten hot or cold and still taste alright.  The proportions here will yield two to three large servings.  Sometimes, I top this with balsamic vinegar, or sunflower seeds.

Ingredients

1 large eggplant
At least 0.5 lb / 0.25 kg spinach
6 T / 180g tahini
1/4 cup / 20g raisins
1/2 cup / 50g walnuts
Grapeseed oil, for cooking

Procedure

Heat up a frying pan to medium heat, with oil
Dice the eggplant into 1' by 1' / 2cm by 2cm cubes.
Cook eggplant until browned and mostly translucent, about 10 minutes, stirring occasionally.
Reduce heat to medium-low and stir in the spinach.
When the leaves are almost entirely wilted, take the frying pan off of the heat and stir in walnuts and raisins.
Stir in the tahini.
Serve.  

Monday, April 8, 2013

Gingerbread Cereal

This is a recipe for a gingerbread flavored granola cereal.  
Although I use coconut oil, one can easily substitute it with unsalted butter, grapeseed oil, or even vegetable oil.  If you use an unsaturated fat, you do not need to melt it.
The cereal is very crunchy when it is ready, although when it is removed from the oven it looks rather wet.  It is spicy-smelling, and would go great with sliced granny smith apple. 

Ingredients:

250g / 3 1/4 cups rolled oats, uncooked
90g / 1/3 cup coconut oil
100g / 1/3 cup dark molasses
20g / 1T clover honey
5g / 2t ginger powder
5mL / 1t vanilla extract
3g / 1t ground cloves
1g / 1/2t ground cardamom
200g / 1 1/2 cup raisins


Procedure:

Preheat oven to 350˚F / 180˚C.
Melt coconut oil.
Stir in molasses, honey, and spices.
Stir mixture into dry oats, and spread oats onto a baking sheet.
Bake for 20 minutes, stopping halfway to stir.
Let sit in a turned-off oven for 5-10 minutes, then mix in raisins and allow to cool completely.  The oats will get very crunchy after cooling.  If you want large clusters of oats to be present in your cereal, then have the mixture cool in clumps instead of as one layer, and do not mix it often.
Let cool completely, then place in a glass jar until ready to serve.

Saturday, March 23, 2013

Orange and Walnut Shortbread Cookies

Shortbread cookies are rather simple to make.  This recipe has a subtle nutty aroma, and the sort of orange you select for zesting strongly influences the final result's smell.  If you have no turbinado sugar, you can easily substitute white sugar, but I also recommend adding a couple pinches of shaved dark chocolate to the batter.

Ingredients:

1/2 cup / 120g butter, unsalted, at room temperature.
190g / 1.5 cup white flour
1/4 cup / 55g turbinado sugar
10 walnut halves, ground
note: you want the largest pieces no larger than 3mm
zest of one small, aromatic orange
1 t / 3mL vanilla extract
Approximately 30 walnut halves
note: or more, depending on how thin and small you cut your cookies

Procedure:

Combine butter, zest, and sugar.
Mix in chopped walnuts flour, and vanilla and combine until dough is homogeneous.
Roll the dough into a tubelike shape and refrigerate for at least 20 minutes.
Preheat oven to 375˚F / 190˚C.
Cut the dough into thin cookie slices.
Top each cookie with a walnut half.
Bake for 20 minutes, rotating the sheet halfway if you have poor convection.
Allow to cool, and serve.

Thursday, March 21, 2013

Chocolatey Banana Bread

Banana bread is a very convenient way to use up blackened bananas.  This recipe for banana bread contains a high amount of whole grains, with chocolatey undertones and chopped nuts for complexity.  It is a good bread for breakfast, with a dough that is not too moist or too dense, thanks to the combined efforts of the baking soda and sour cream.

Ingredients:

1 cup / 120g whole wheat flour
.5 cup / 50g rye flour
.5 cup / 65g white flour
2 t / 9g baking soda
2 T / 11g cacao powder
3 T / 25g dark chocolate, chopped and/or shaved
1 cup / 200g turbinado sugar
.75 cup / 180mL milk
1 tsp / 5mL vanilla extract
.25 cup / 55g coconut oil
3 very ripe bananas
2 eggs
4T / 58g sour cream
10 hazelnuts

Procedure:

Preheat oven to 375˚F /
Sift together flours, cacao powder, shaved chocolate, and baking soda.  Add sugar and stir.
Mash bananas into a paste in a separate bowl.
Melt coconut oil and stir into bananas.
To banana mixture, incorporate milk, vanilla extract, eggs, and sour cream.  Stir until
homogeneous.
Chop hazelnuts roughly.
note: a mortar and pestle is ideal for this.  Shoot for chunks the size of pebbles.
Once the oven is ready, quickly divide mixture into two standard (8' by 3' / 21cm by 8cm) pans.
Top with hazelnuts, and bake for 45 minutes.

Monday, March 18, 2013

Healthy Chocolate Covered Fruit

In Russia, it is rather common to serve tea with small candies.  A popular sort of small candy is chocolate-covered dried fruit, stuffed with a nut.  This recipe recreates these candies, but while it is very tasty, it is also very ugly.  Do not let the appearance discourage you!
This procedure can be used as a guide for lots of different fruit and nut combinations.  My very favorite is prunes with toasted almonds.
The chocolate sauce can of course be substituted with simple melted chocolate.  The charm of the coconut-oil based coating is that it smells very strongly of coconut, and you control the amount and type of sugar as well as cacao powder.  If you do choose to use melted chocolate instead, know that the layer of chocolate on each fruit will be much thicker.
In such a simple recipe, quality must be high.  Use good chocolate, aromatic coconut oil, soft dry fruit, and toasted nuts for candies worth serving with tea.

Ingredients:

18 dried apricots, whole
18 walnut halves
3T / 50g extra virgin coconut oil
3T / 25g cacao powder
2T / 25g sugar

Procedure:

Melt the oil and sugar.  Stir in the cacao powder, making sure to avoid clumps.
In each apricot, make a long slice, so that the apricot becomes a pocket.
Place one nut in each apricot.
Dip apricots in to the chocolate mixture, and place on a piece of parchment paper.
Move to a cold place.
At this point, the chocolate coating will be rather thin on the fruit.  If you wish to make it thicker, allow coating to dry and quickly redip the candies.
Allow the coating to harden completely, and serve.

Saturday, March 9, 2013

Yeast-Risen Rhubarb, Blackberry, and Ginger Dessert Bread

As spring comes around, it is difficult to think of anything but yeast-risen rhubarb, blackberry, and ginger dessert breads.

The yeast really makes this recipe's dough a hybrid of bread and dessert, with a texture which allows it to be pulled apart instead of crumbling.  The ginger adds a somber note to its smell.
This recipe is great to be served alongside breakfast.  With enough sugar to be sweet, but enough berries, whole wheat, ginger, and savory aspects to its taste to be satisfying.  The current baking time yields a cake with a cracked, smooth crust and a moist, poundcake-like inside.
To get a drier, more bread-like dough, you could try baking it either for an additional ten minutes, or at a higher temperature (425˚F / 220 ˚C), keeping a cover on top of the dough as is bakes for 30 minutes and removing it in the last 10 minutes.
If you wish, you could cut this bread into slices and make it act as a fancy sandwich.  Spreading it with mascarpone and adding strawberries is very good indeed.

Serving suggestion.

Ingredients:

1.5 cup / 240g white flour
1cup / 170g whole wheat flour
1 cup / 410g turbinado sugar
1/3 cup / 80mL almond oil or butter
2.5 cup / 300g rhubarb, cut into pieces and washed
1/2c / 70g blackberries
3T / 7g grated ginger
2 eggs
3/4 cup / 240mL milk
2 heaping t / 10g active dry yeast
handful strawberries or blackberries (optional)

Procedure

Heat the milk until it is warm to the touch, as close as possible to (but not over) 37˚C / 98˚F
note: in the microwave on high power it is reached in 50seconds, be sure to stir before using thermometer
Mix sugar, white flour, milk and yeast, and let sit for 1-2 hours in a place as close as possible to 37˚C
Mix in the eggs and additional almond oil.
Sift in the extra flour, then add the berries, ginger and rhubarb
Pour dough into a greased baking pan and let sit for half an hour in a warm environment
If so desired, after the half hour, line the pan's edges with sliced strawberries or blackberries
note: I forgot to do this.
Bake at 350˚F/180˚C for 40 minutes.
Let sit in the turned-off oven for 7 minutes if you are not satisfied with the brownness of the crust on the bread.
Remove from oven and let cool under a cotton cloth until warm.
Serve with milk.


Thursday, March 7, 2013

Grapefruit Greek Yoghurt Parfait

This is a tasty, protein-rich yoghurt recipe.  You could either make it for breakfast, or prepare it in a small jar-like container and have it for lunch.  Many elements in the recipe can be adjusted to suit what you have in your kitchen.  I will definitely be using this greek yoghurt-mascarpone base for more lunches, and look forward to trying out new ingredient combinations.

Ingredients:


1 cup / 250g Greek-style yoghurt, plain
note: I use nonfat, and the amount of mascarpone added masks the sour taste.
2 T / 32g mascarpone
1T / 21g honey, ideally one with a strong flavor such as buckwheat honey
3-6T / 30-60g oats, rolled or steel-cut
1 segment of grapefruit
Pinch of grapefruit, lemon, or orange zest
Splash quality vanilla extract
Handful blueberries


The greatest charm of a parfait in a clear container is that the
fruit, oatmeal, and yoghurt often fall into a face-like shape.

Procedure:

Combine the honey and mascarpone, mixing well
Add in Greek yoghurt and scrape the grapefruit segment's pulp into the mixture, do not get any of the fibrous walls into the mix
Add vanilla and zest.  Mix until homogenous.
Layer blueberries, oats, and yoghurt mixture into a container or bowl.
Let sit overnight, chilled, or at least for two hours.


Saturday, March 2, 2013

Restaurant Review: Cumin

To celebrate my birthday, my parents and I decided to go to a restaurant in Cincinnati called Cumin.

We arrived just as the restaurant opened.  The first thing that struck us was the decor, which was very tasteful.  After we ordered our dishes, and in between courses, we often supplemented our conversation with comments about the color scheme, the lighting, and the very cool backlit wooden wall.

The menu wasn't massive, but each item sounded so interesting that it was very hard to make up our minds on what we wanted.   We ended up ordering two courses each.  Our waitress often checked up on us, and offered good advice on what to order.  After she collected our menus, she brought out a basket with bread.


The bread, which was with white flour, was accompanied by a farmer cheese spread.  The bread itself was very very good, with a soft, bubbly center surrounded by shock of crispy crust.  It was so warm and steamy that it must have been baked and sliced right before serving.
The farmer cheese spread we suspected to contain farmer cheese, called tvorog by russians, as well as heavy cream, and just the right amount of salt to go well with the bread.

I am not anywhere near baking with yeast well, but I seriously hope to learn to make a bread similar to this someday.


As we munched the bread, we could hear and smell our first courses being made.  I ordered the "Scallop Terrarium" ( I found it on the online menu, and its description says Butter baby potatoes, bacon jam, wheat grass, “dirt”), my father ordered a heart of palm salad, and my mother ordered the daily soup, which was a tomato-basil bisque with ricotta.  I could not find their dishes' formal titles or their descriptions on the online dinner menu.  
All three dishes were brought at the same time, and all were presented beautifully.  I didn't manage to photograph neither the palm heart salad nor the soup, but both were very well-crafted in terms of ingredients.  The soup was comforting, while the salad was tangy and was tastefully garnished with black caviar.
I was completely delighted with the scallop terrarium.  The major flavors were bacon, smoke, and the scallops' natural sweet taste.  The bowl you see was brought out covered in saran wrap, which was removed to let out a smokey-smelling fog from the bowl.  The edible "dirt" was nutty and sweet, but we could not discern the exact ingredients.  I strongly recommend this dish to anyone who likes bacon and adorable, creative dish presentation.


After our first course, we were feeling very full, and worried that we would not have space inside of us for any more food.  Thankfully, while the chefs prepared all of our foods fresh, we got to wait, digest, and enjoy each others' company.
For the main course, I ordered steamed buns with pork belly, cabbage, and fermented curry paste.  My mother ordered seared monkfish with lobster tortellini, and my father ordered a venison (poblano pepper, celery root, currant glaze, coffee grounds, arugula, venison reduction).  I did not manage to get photos of everyones' dishes, only the pork buns.
The dishes arrived just as we finished feeling completely stuffed, excellent timing.  The venison was very flavorful and not overcooked at all.  The monkfish, too, was cooked just right, and the lobster tortellini were large and had a good amount of stuffing.  The monkfish was garnished with bits of caviar, and both plates had very pretty sculptures of ingredients and sauces scattered around the meat.
As for the pork buns, I was completely blown away.  I have a large sweet tooth and my favorite dishes are normally sweet, but in this case, the best meal of the night for me were these pork buns.  The buns were made of baozi dough, and there were fresh greens placed atop a wonderful slice of pork belly.  I've never had pork belly before, but its smooth texture was so great that I must have it again.
I was unladylike and devoured the two buns using my hands.  I hotly recommend this dish to everyone who likes baozi and chinese spices.


After we finished our second course, we were incredibly happy with our meal and life in general.  The service in Cumin was very attentive.  Our table was cleared by a cheery gentleman, and the regional manager of Cumin and its sister pizzeria later came up and spoke to us.  He told us of his plans for remodeling the interior of the restaurant soon, including painting over this wall.
We will miss these paintings, but look forward to seeing how Cumin will look after being modernized some more.
The manager also explained to us that although Cumin used to be an Indian restaurant, it had switched its type of cuisine five years ago.  Cumin had kept its name to avoid losing regular customers, but also caused a lot of people to expect Indian food when they visited.  


After being enlightened about the restaurant's history (before speaking to the manager, my parents and I wondered whether Cumin was an avant garde Indian restaurant, or perhaps Native American?) we were presented with dessert menus.  Despite being very full, we decided to party it up and order desserts, too.
My mother ordered a raspberry clafoutis, my father ordered a root beer float made with vanilla gelato and a chocolate chip cookie, and I ordered a hot-cocoa Madagascar vanilla gelato dish.  The online dessert menu displays different foods than these, which means that the desserts must be rotated often.  Excellent.
The raspberry clafoutis had fantastic dough, it was a custard/cake hybrid.  The gelato served with it, although I don't recall the flavor, was light and fruity.  The clafoutis were garnished with toasted and sweet brazil nuts, whose earthy flavor was an unexpected and much needed accompaniment to the dessert.


My choice was also very good.  The hot cocoa sauce indeed tasted like hot cocoa: the chefs totally nailed the
mysterious element which makes hot cocoa different from chocolate.   The coffee whipped cream which garnished the sauce was subtly sweet.  The vanilla gelato was not too fatty, like ice cream would have been.
In a very sweet gesture, upon learning that my parents and I were celebrating my birthday, the cook staff put a candle in my ice cream!


My dad greatly enjoyed his root beer float.  Cumin managed to make this dessert fancy, with high quality root beer and excellent gelato.  I'm not sure whether this photo captured the cookie's size well, but it was genuinely massive, approximately 2cm tall and 10cm long.  It was great for sharing, with a texture similar to a dense scone.

Putting a pleasant end on our evening, as we left the restaurant, we noticed that a bird had made its nest in the center of Cumin's "m".  It looks charming, almost intentional, as it is very symmetrical placement.
In conclusion, we had a great time at Cumin, and will be returning again.  We must also check out the sister pizzeria, M Wood Fired Oven.  

Cumin Restaurant
3520 Erie Ave.
Hyde Park, Cincinnati
(513) 871-8714

note: the opinions for this review are my own.
Cumin Eclectic Cuisine on Urbanspoon

Friday, March 1, 2013

Natto Shiitake Soup

This recipe is for a very busy soup.  The broth is flavorful, although for me there were too many ingredients and not enough liquid.  The most important flavoring ingredients here are the chives, dash, miso paste, and dried shiitake mushrooms (which impart a different flavor than fresh ones).  The rest of the ingredients are more or less dynamic, so you can easily substitute or add vegetables and protein sources.  I recommend still including some form of seaweed, however it is not necessary.
The current ingredients yield two normal or one massive serving.
Next time I make this soup, I will keep the ingredients the same but add closer to 2.5 cup / 600mL water.

Ingredients:

1 small turnip
1 small carrot
1T / 3g dashi granules
1-2 chives
4 dried shiitake mushrooms
1T / 7g brown rice miso paste
4 strands dried seaweed
1T / 3g dulse flakes
1 package / ~80g natto
1.5 cup / 355mL water
1 filet of fish (included in procedure) or tofu, cubed

Procedure:

The night before making this soup, steam raw fish fillets until they are cooked to your liking.  Into the steaming liquid, add copious garlic, ginger, and parsley.
note: I had rainbow trout, steamed it for 25 minutes, and added approximately half of a sliced root ginger, ten sprigs chopped parsley, and three cloves garlic.
The night before, also submerge the shiitake in cold, filtered water, or cover in hot water for 30 minutes before beginning to cook.  After soaking, cut each mushroom into fourths.  Slice the stems into thin rounds.
Slice the turnip into thin rounds.  Cut the carrot into matchsticks.
The dulse flakes are responsible for the soup's
ugliness, but also for much of its flavor.
Place turnip, water, dashi granules and soaked shiitake into a pot.  Bring to a boil and quickly reduce heat to medium-low.
note: if you want your carrot soft, you can add it to the water in this step, as well.
Cover your seaweed strips in cold water and let them sit for five minutes as you do the next step.
While the seaweed soaks, mash the natto and the miso paste together, to make it more or less one mixture.  Stir it into the soup.  Add chives, and carrots, if you did not to so previously.
Remove the seaweed strips from the water and rinse them very well.
Into a bowl, place your fish fillet or sliced tofu.  Garnish with seaweed strips, and pour broth over.
Sprinkle dulse flakes on top and serve immediately.

Monday, February 25, 2013

Lunchboxing

These past days, I've decided that my stomach and campus food aren't ever getting back together.  So, I've taken to packing my own lunches!
The lessons I've learned while packing lunch feel rather valuable, and so I will share with the Internet my lunch ideas from time to time, as well as just some good lunch-packing tips to keep in mind if you want to take a home cooked meal to work.

The sample recipe I've included is Japanese inspired.  The main part of it is rice, fermented soybeans, and an egg.  The side dish is salad, and the snacks are nori and carrots.  The process takes about an hour and a half, but you will be actively working for 15 minutes at most.  The rest of the time is just for the rice to cook.

Rules of Thumb:
♕ If your lunchbox is solid, try to have it just filled completely.  This reduces how much your food jiggles around as you carry it.
♕ While preparing your food, think of meals that you enjoy cold.
♕ Also, think of foods that become better the longer they sit, like marinades or tiramisus which absorb cream.
♕ Try to increase your collection of small containers, a few centimeters tall.  These are excellent for holding garnishes like sauces, berries, nuts, and herbs separate from your meal until right before eating.
♕ Following that strain of thought, try to keep as many things as possible separate in your lunch.  Sandwiches are oft best fresh assembled, so keep the bread away from the soggy components if at all possible.
♕ Invest in reusable plastic eating utensils, plastic baggies, and plastic containers for maximum glass-shard prevention.  Tight screw on lids are nice too, lest your lunch gets leaky and freaky.
♕ Know how you respond to certain foods.  I get very drowsy after eating Greek yoghurt always, so when I want it for lunch I also pack some coffee.
♕ As always, try to keep things healthy.  A multicolored lunch filled with whole grains, good proteins you don't mind eating cold, and many fruits and vegetables will provide great satiety.
♕ If you are worried about having halitosis after finishing lunch, you can pack some foods which naturally cleanse the breath, such as a few cardamom pods or cilantro.

Sample Lunch Ingredients:

 1 cup / 90g forbidden rice (a purple glutinous rice sold in many Asian supermarkets)
 2 cups / 475mL water
 1 pouch (60g) natto
 1 egg
 1T / 15g mustard
 .5T / 7mL soya sauce
 1 cup / 50g torn lettuce
 1t / 3g black sesame seeds
 2T / 5mL salad dressing
 Handful carrots, sliced as you wish.
 1-2 sheets toasted nori, cut into ~6cm by ~3cm rectangles
Under the egg, bottom left, sits the natto, while at the top
you can see the forbidden rice in all of its blackness.
I use a small, rinsed container from peanut butter for my
main dish.

Procedure

For the rice

 Boil the water, add rice, cover
 Simmer for 30-45 minutes, stirring occasionally
 Take off heat and let sit for 15 more minutes.
 Spoon about a fourth of the recipe into a small sealable plastic container.
note: as soon as you are done with the rice, refrigerate.  Forbidden rice gets its deep purple color from minerals and all sorts of healthy molecules the grains contain inside.  While this makes the food nutritious for you and me, it also makes it delicious for many bacteria.  I left the cooked rice on my stovetop overnight, and in the morning there was so much bacterial growth in it that it had to be disposed of.
If you cook brown or wild rice instead of forbidden, the same warning applies.  The risk is lessened with white rice.  You should still refrigerate it though.
 Top with natto.
 On a pan, break an egg and cook to desired doneness.
 Top natto and rice.
 Into separate container(s), pour mustard and soy sauce. 
note: they are added to the natto and rice.


For the salad

 Tear leaves, cover in sesame seeds.  Put into container.
 Pour dressing into separate container.

Assembly

 Into one plastic bag, place carrots.
 Into another, place nori.
 Arrange your salad and rice containers.
 Into remaining space, put dressing containers.
 Place plastic bags on top of containers.
 Insert eating utensil (chopsticks or fork)  
 Refrigerate until ready to go

♕ The morning of, I made some green tea to go with the meal.